Fun with stereographic photography
Stereographic photography (or stereo photography for short) involves taking two slightly different pictures of the same scene so that viewing them in a certain way produces a 3-dimensional image. Having seen some examples of stereo photos recently, I decided to do some research and experiment by making some of my own.
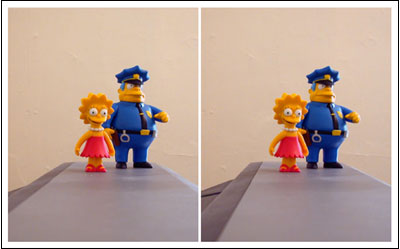
To view the images in 3-D, cross your eyes until a composite image forms in the middle (it even works with the thumbnail above). From what I’ve read, a small percentage of you (5-10%) won’t be able to see the effect, so if you can’t get it to work, that might be why.
Stereo photography turns out to be fairly easy to do if you’re not concerned with exact results, even if you only have one camera. Choose an appropriate scene and photograph it from two different positions a small distance apart, making sure to keep the camera as horizontal as possible. That distance depends on distance between the camera and the scene, but for most pictures, an inch or two of separation between camera positions is sufficient. For the Lisa Simpson image, the figurines were about two feet away and I moved the camera only about an inch between shots. Make sure you keep track of which photo you took from the left side and which you took from the right. That’ll be important when preparing the images for viewing.
Download the photos to your computer and adjust the images in Photoshop (or a similar program) to compensate for any camera unsteadiness. They need to be horizontally & vertically aligned, color corrected, and cropped so that the two photos look as much alike as possible. The easiest way to do this in Photoshop is to paste one image on top of the other in its own layer. Decrease the opacity in the top layer to 50% and adjust to your heart’s content.
When preparing the images for viewing, tall images seem to work better than wide images in getting the proper 3-D effect. Keep image sizes small; if the images get too wide, you won’t be able to cross your eyes enough to see the effect. To view the images, place them side-by-side on the screen or print them out, placing the photo you took from the right side on the left and the photo you took from the left side on the right (if you don’t switch the photos, you’ll get a strange inverse 3-D effect). Then cross your eyes until a composite image appears in the middle.
If you’re interested in trying stereo photography, here are some links to help get you started:
A Crash Course in Stereo Photography
An Introduction to 3-D (Stereoscopic) Photography
How To Take Stereoscopic Photography
A History of Stereoscopic Photography
A Guide for New Stereo Photographers
The Simple Making of Stereoscopic Photography
Better examples of stereo photography than mine:
Stereoscopic Photography of Flowers in Japan
High Quality Stereopictures
Okuyuki’s 3D Photo Gallery
Early 19th Century Stereographs
Stereoviews by Dan Shelley
David’s Stereoscopic Photo Gallery
Stereo Photography of Fluorescent Minerals
Celebrity Stereo Photography
Socials & More