Eye-Fi is a wireless memory card for digital cameras. Once you get it set up, you take a photo with your camera and it’s automatically uploaded to your computer and to Flickr (or another photo sharing site of your choosing). The first thing you notice about the Eye-Fi is that it looks just like an ordinary 2-gig SD card…so tiny that when you use it for the first time, you almost can’t help but examine your camera from all angles to make certain that there are no wires involved. It’s magic.
But can an enchanted memory card make you a better photographer? That is, does it make you want to use your camera more and take better pictures? I’ve been testing an Eye-Fi for the past week, courtesy of my friends at Photojojo (where every order comes with a Blow Pop!). The setup and usage were pretty easy. Not having to fuss with an uploading cord was nice. I didn’t like the requirement of setting up each wireless connection you want the card to use; it should find open wireless access points when it can. But after a week of using the card, I finally figured out the optimal way to use the Eye-Fi:
1. Get a Flickr account.
2. Set the Eye-Fi to upload automatically to your Flickr account with the privacy set so that only you can see it.
3. Use Flickr’s online organization tools to publish, group, tag, or order prints of the keepers and discard/ignore the rest.
Instant online-only workflow…no intermediate “download then find the best ones then upload” steps required, everything happens right in Flickr. The lack of editing tools (brightness, levels, etc.) on Flickr might be a deal breaker for some, but for the rest, it certainly makes it easier to take a lot of photographs and get them up where family and friends can see them.
The folks at Photojojo sent me a Monsterpod late last month and while I haven’t used it a lot yet, it certainly does work as advertised: it’s a little tripod that sticks to pretty much everything. Chris Spurgeon has a short review.
If you asked me today to choose a medium in which to focus my future artistic energies, I’d have to go with the photo can. After finding this great Photojojo tutorial yesterday on using tin cans and glass jars as photo frames, I selected three recent pictures I’d taken and made this can triptych:
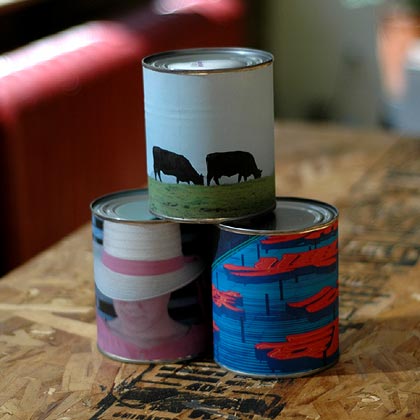
So cool! And simple too. I didn’t follow Photojojo’s directions exactly and I have a few observations to offer for those looking to play around with this:
- Paper quality. I just used regular old printer paper, not glossy photo paper or anything like that. This made the photos look more like actual cheap labels. I also didn’t worry too much about being careful with the glue. Again, a little mistake here and there actually enhances the effect.
- Glue. I removed the original label from the can and glued the photo directly to the can itself. Instead of rubber cement, I used a glue stick with acid-free acrylic emulsion. The glue stick made application really easy. And I didn’t apply the glue all the way around the can. I just glued down one end to the can, waited for that to dry, wrapped the photo around the can, pulled it tight, and glued the underside of that end to the end already affixed to the can. (When I tore the existing label off the can, I noticed that’s how it was glued on there, so I tried the same thing and it worked.)
- Can size, etc. Shopping in the canned food aisle of the supermarket takes on a different meaning when you’re not attempting to find green beans for dinner but trying to find aesthetically pleasing art supplies. I went with a larger can, one with stewed tomatoes; its proportions seemed more pleasing than those of a soup can. The problem was that when I got it home, it was almost 13 inches around, meaning that 8 1/2” x 11” paper wasn’t going to work. (I ended up getting some 8 1/2” x 14” paper.) So bring your tape measure to the grocery store with you to make sure the desired can will work with your paper size.
- No pop-tops. A lot of soup cans now feature pop-tops. Get the old fashioned kind instead…the last thing you want is Uncle Steve lifting your photo can off of the coffee table, fiddling with the pop-top, and, hey!, Chunky Vegetable three years past its expiration date all over the place.
- Botulism? Speaking of past the expiration date, what’s the shelf life of your artwork? The answer seems to be almost indefinitely when kept at temperatures at or below 75 degrees F, but I wouldn’t advise eating anything from your photo cans after a year or two. The risk of botulism is almost nonexistent in contemporary commercially canned food, but if you see any of your art swelling up, throw it out. In addition, botulism dislikes acidic environments, so you’re probably better off selecting cans with acidic food items in them, like tomatoes, fruits (without sweet syrups), and sauerkraut. But be careful not to get items that are too acidic…over a long period of time, the acid may eat through the can.
Good luck!
Socials & More